Creating a lightweight custom Vagrant box from scratch

Do you want to know how easily and fast can you have your development environment running with Vagrant? Then keep reading.
Vagrant provides easy to configure, reproducible, and portable work environments built on top of industry-standard technology and controlled by a single consistent workflow to help maximize the productivity and flexibility of you and your team. Vagrant documentation.
Why use Vagrant?
It’s very easy to replicate, maintain and update your development environment. If you are a developer or a designer, what you really want is to get your job done, Vagrant automates the work of having to set environments up. You can just checkout your code and start working within seconds.
Imagine a large team working on a single project, where everybody has different preferences on the systems they use, they shouldn’t be forced to use the same Operating System for the sake of having the same environment as the production server. With Vagrant they could have, in a very short time, an identical environment to production without sacrificing happiness and you can also forget about “It works for me” moments.
You can combine it with provisioners like Chef, Puppet or Ansible to make it even more powerful or you can just install the software manually or through scripting if you are more experienced. Forget about using WAMP or MAMP and avoid future headaches.
Why not use Vagrant?
I don’t, particularly, think I found any disadvantages to using it.
It might be difficult to set up and export a package box and it requires some basic knowledge of the system and stack you are going to use. It could take longer to create the initial box, but you can solve that by either using an already customised box or configuring yours with a tool like PuPHPet, where you can export a config file and execute one command.
What do you need?
You will need either Virtualbox or VMWare to create and manage virtual machines, which will then be handled by Vagrant.
Obviously, you will need Vagrant, which you can download here depending on your system: Vagrant Downloads.
Once both are installed you can start building your machine or download your customised box.
You might need to enable Hardware Virtualisation in the BIOS.
Let’s get started!
How to create a Vagrant box with LAMP stack and Ubuntu?
First steps using a fresh virtual machine
You can skip this part and go to “First steps using a base box” if you prefer to download a box, otherwise, download the latest Ubuntu Server version here. [1]
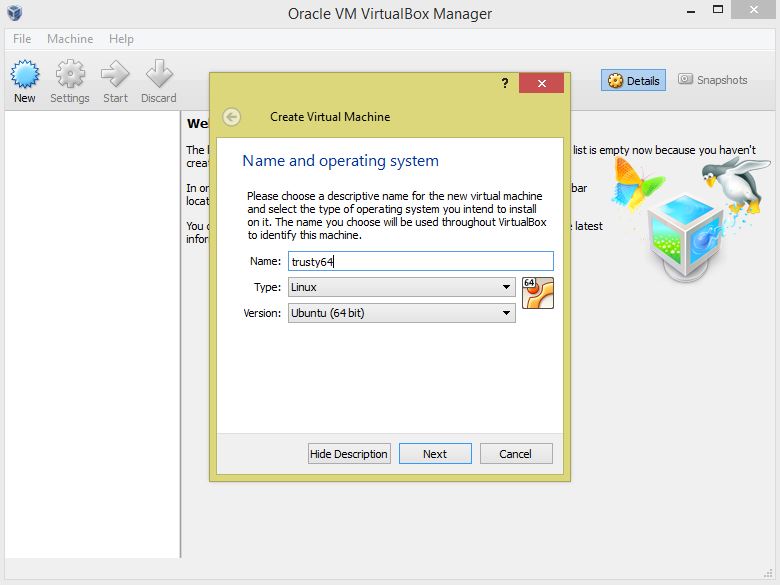
If you chose to install Ubuntu from the ISO, you will have to create a virtual machine and boot with the image attached. First of all, you will have to configure the machine.
The name in my case will be trusty64, type Linux and version Ubuntu 64.

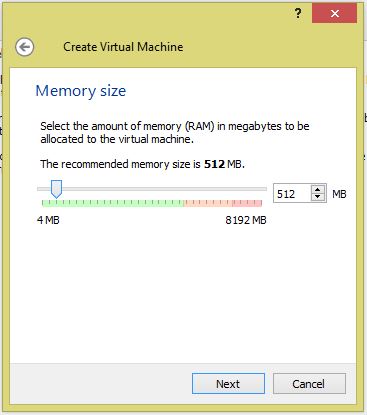
We can leave the memory to the default value: 512MB.

Create a disk and choose Dynamically allocated option with a minimum of 20GB.
You will also have to add a Network adapter from the machine’s configuration and this must be NAT.
You can now proceed to install the OS following the steps. Choose ‘vagrant’ for user and ‘vagrant’ for password.
Change the password for root to ‘vagrant’:
$ sudo passwd root
add vagrant user to sudoers:
$ sudo visudo /etc/sudoers.d/vagrant
and set vagrant’s ‘NOPASSWD’ to ‘ALL’ adding at the end of the file the next line:
vagrant ALL=(ALL) NOPASSWD:ALL
Then execute the following commands to update and restart the machine.
$ sudo apt-get update -y
$ sudo apt-get upgrade -y
$ sudo shutdown -r now
When you are logged in again to the vm you will have to copy the public key from Insecure Key Par to ~/.ssh/authorized_keys or check it out in the terminal.
Create, if it doesn’t exist, the .ssh directory and .ssh/authorized_keys. ~/.ssh must have 700 permissions and authorized_keys 600.
$ mkdir /home/vagrant/.ssh
$ chmod 700 /home/vagrant/.ssh
$ wget --no-check-certificate https://raw.github.com/mitchellh/vagrant/master/keys/vagrant.pub -O /home/vagrant/.ssh/authorized_keys
$ chmod 600 /home/vagrat/.ssh/authorized_keys
We can now install open-ssh and the guest tools.
$ sudo apt-get install -y openssh-server
Check for the next lines inside the file /etc/ssh/sshd_config and restart ssh.
PubKeyAuthentication yes
AuthorizedKeysFile %h/.ssh/authorized_keys
$ sudo service ssh restart
To install the Guest Additions run:
$ sudo apt-get install dkms
$ sudo /etc/init.d/vboxadd setup
$ sudo apt-get install -y build-essential linux-headers-server
$ sudo mount /dev/cdrom /media/cdrom
$ sudo /media/cdrom/VBoxLinuxAdditions.run
$ sudo umount /media/cdrom
First steps using a base box
You can also find boxes at vagrantbox.es or vagrantcloud.
I have chosen vagrantcloud’s trusty64. Now open a terminal in the host and go to the directory where you have it. Don’t worry about the name, you can change it later when you export your own box.
$ vagrant box add ubuntu/trusty64 --provider virtualbox
$ vagrant init ubuntu/trusty64
$ vagrant up
$ vagrant ssh
Installing software
We can now start installing the software we need for our development environment. In my case I will install Apache, MySQL, PHP and PHPMyAdmin. Set up the necessary users and passwords and test everything is working.
$ sudo apt-get clean -y
$ sudo apt-get update -y
$ sudo apt-get upgrade -y
$ sudo apt-get install apache2 apache2-utils
$ sudo apt-get install mysql-server libapache2-mod-auth-mysql php5-mysql
$ sudo mysql_install_db
$ sudo /usr/bin/mysql_secure_installation
$ sudo apt-get install phpmyadmin
$ sudo apt-get install php5 php5-mysql php-pear php5-gd php5-mcrypt php5-curl php5-memcache
$ sudo service apache2 restart
$ sudo nano /var/www/html/test.php
<?php
    phpinfo();
?>
Open localhost/test.php in your browser and check for the PHPInfo.
Reducing the size and final adjustments
We are going to have the code outside the box within a shared folder between the host and the guest, so Git or SVN wouldn’t be needed inside the machine. For the shared folder you can choose /var/www/html by default or change it to /vagrant or any path/name of your own. Make sure you have the same path in the Apache’s config file.
$ sudo vim /etc/apache2/sites-enabled/000-default.conf
<VirtualHost *:80>
    ...
    DocumentRoot /var/www/html
    ...
</VirtualHost>
You can reduce the size [2] [3] or shrink your machine considerably just by using the following commands.
$ sudo rm -rf /usr/share/doc
$ sudo apt-get clean -y
$ sudo apt-get autoclean -y
$ sudo dd if=/dev/zero of=/EMPTY bs=1M
$ sudo rm -f /EMPTY
$ sudo unset HISTFILE
$ sudo rm -f /root/.bash_history
$ sudo rm -f /home/vagrant/.bash_history
$ sudo shutdown -h now
Vagrant file
It is possible to include a configuration file with your box, I will include a forwarded port for port 80 and a shared folder, this must be the one specified before in the Apache configuration. Here, you can also include the default name you want to give to you box. Create a file in your host with the required configuration.
  # -*- mode: ruby -*-
  # vi: set ft=ruby :
  Vagrant.configure(2) do |config|
       config.vm.box = "vagrantlamp"
       config.vm.network "forwarded_port", guest: 80, host: 8080
       config.vm.hostname = "vagrantlamp"
       config.vm.synced_folder ".", "/var/www/html"
  end
Package your box
Your virtual machine should now be ready for exporting, you can do that using vagrant package command. Just specify the name of the .box file and include the Vagrantfile edited before.
$ vagrant package --output vagrantlamp-0.1.box --Vagrantfile Vagrantfile
Testing it
Create your vagrant projects directory anywhere in your system and change your path in the console to that folder. Once there, add your box (add the path to your file created before), initiate it and get it running.
$ vagrant box add test vagrantlamp-0.1.box
$ vagrant init test
$ vagrant up
You can now copy the projects (clone or checkout your repository) inside this directory and you should be able to see it in the browser at:
localhost:8080/your_project_directory_name
Useful commands
Just a few commands you may find useful, see the documentation for more details.
$ vagrant up
$ vagrant reload
$ vagrant halt
$ vagrant ssh
$ vagrant destroy
Conclusion
Following these steps will help you build a new environment in a matter of minutes instead of hours and it is so powerful and practical you will not want to do it other way any more.
Making use of provisioners, as I said before, it would be much better solution, given that it can automatically install the necessary software and keep it up to date easily, as well as having all this configuration under version control.
If you want to know how to get a Digital Ocean droplet running in just a few minutes using Vagrant and Ansible you can find it at Vagrant and Ansible at Digital Ocean by Edgar, thanks to whom I have found out about Vagrant.
